
HOWF Documentation
Welcome to the FlowHost Documentation.
We're continually building and improving this resource. If anything is unclear or if you would like a guide for something specific, please don't hesitate to reach out. 🙂

Creating a Website
Adding a website is pretty straightforward, There is a button labeled Add a Website. This button prompts a modal that asks you about the website details:
Website Domain: This is the domain you own and would like to create, You will need to validate ownership after this.
Make sure that this input is supported:
- Do not include “www.”
- Do not include “https://.”
- If it’s a subdomain like demo.WebsiteName.com It will be accepted.
Website Name: You can give this value anything really but we suggest making it reasonable enough.
Let’s say the website you are creating is called DennisDesigns.com, It could be Dennis Portfolio or Dennis Website. Anything really.
Hosting Space: You have multiple options to host your sites:
FlowHost: This is our own dedicated hosting, so no need to host externally, this is the easiest to setup and the most straight forward.
Netlify: If you would like to host your website on netlify, you can pick this option, connect your netlify account and select the netlify site youd like this site be associatred to, everytime you publish via the flowhost platform, we deploy to your connected netlify site
Github: If you would like to host your website on GitHub, you can pick this option, connect your Github Account and select the github repository you'd like this site be associated to, every time you publish via the FlowHost platform, we deploy to your connected GitHub Repo
S3: If you would like to host your website in an S3 Bucket, you can pick this option, You have to grant us access to your S3 Bucket via Access and Secret Keys and provide a path you'd like to publish to alongside the Bucket name, every time you publish via the FlowHost platform, we deploy to your connected S3 Bucket
Website Export(Optional): This is the website file you get from Webflow, When you export a Webflow website, you get a .Zip File. This is the Zip file you upload, If you modified the file, just ensure that the structure of the file is the same as a Webflow exported file. You don't have to upload the file at this time, you can do it later :)
After Creating the website
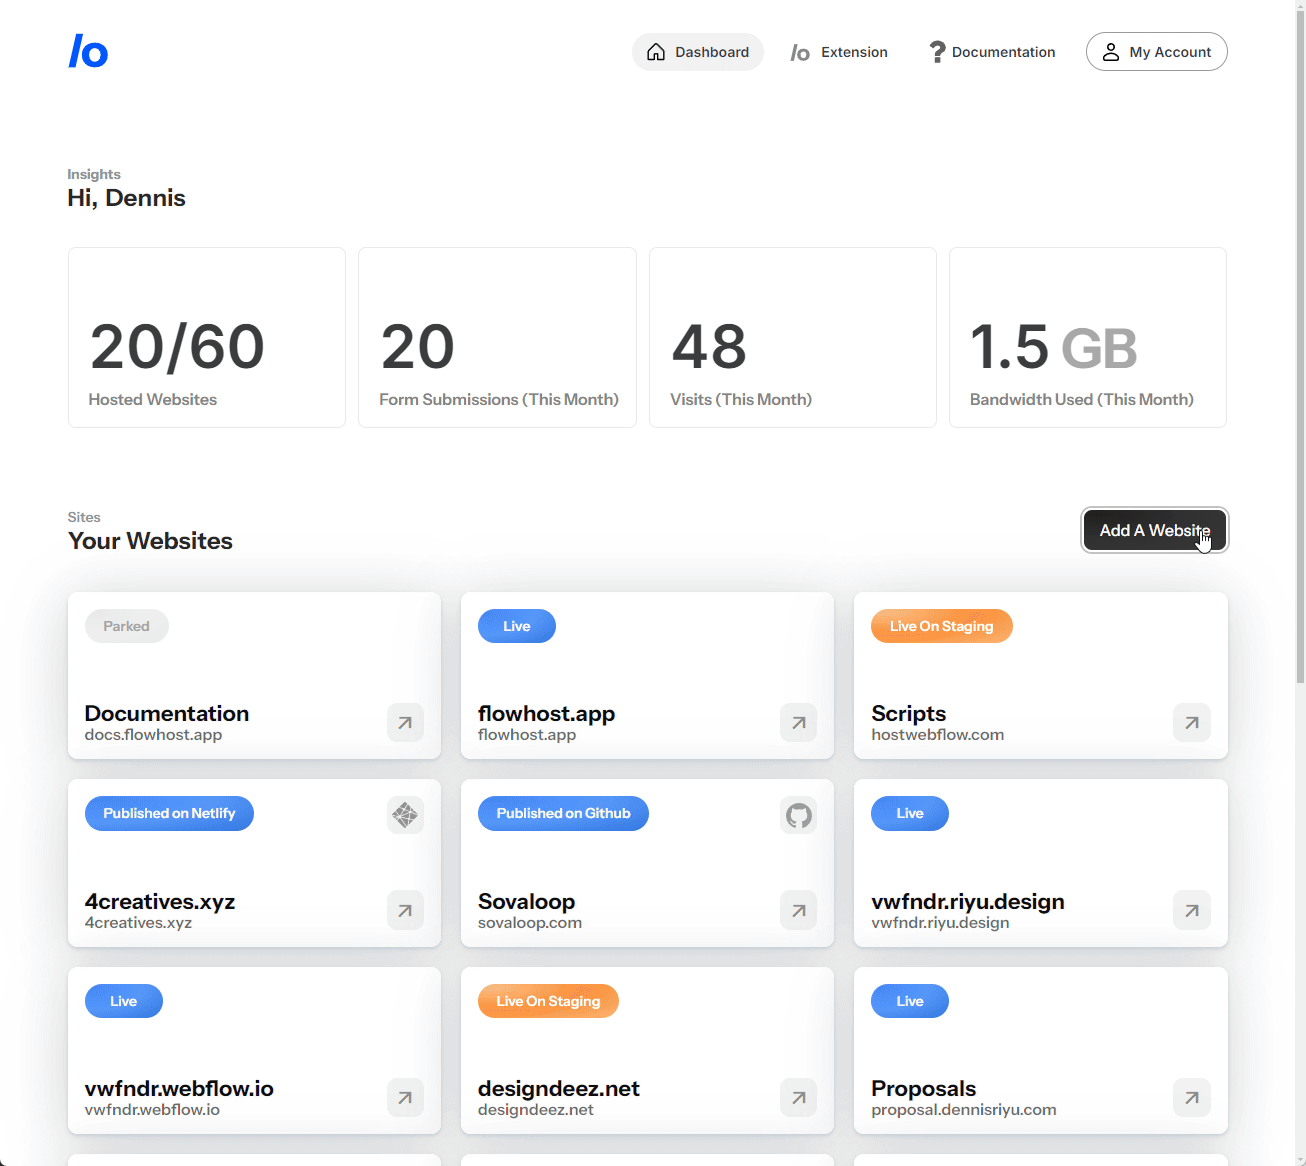
Once you Click Add Website: You will be taken to the website dashboard, Here you can manage everything that deals with the website.
- Publishing files
- Uploading files
- Unpublishing files
- Adding files
- Forms
- Analytics
- Connecting your Domain
At first, it will be empty like this:
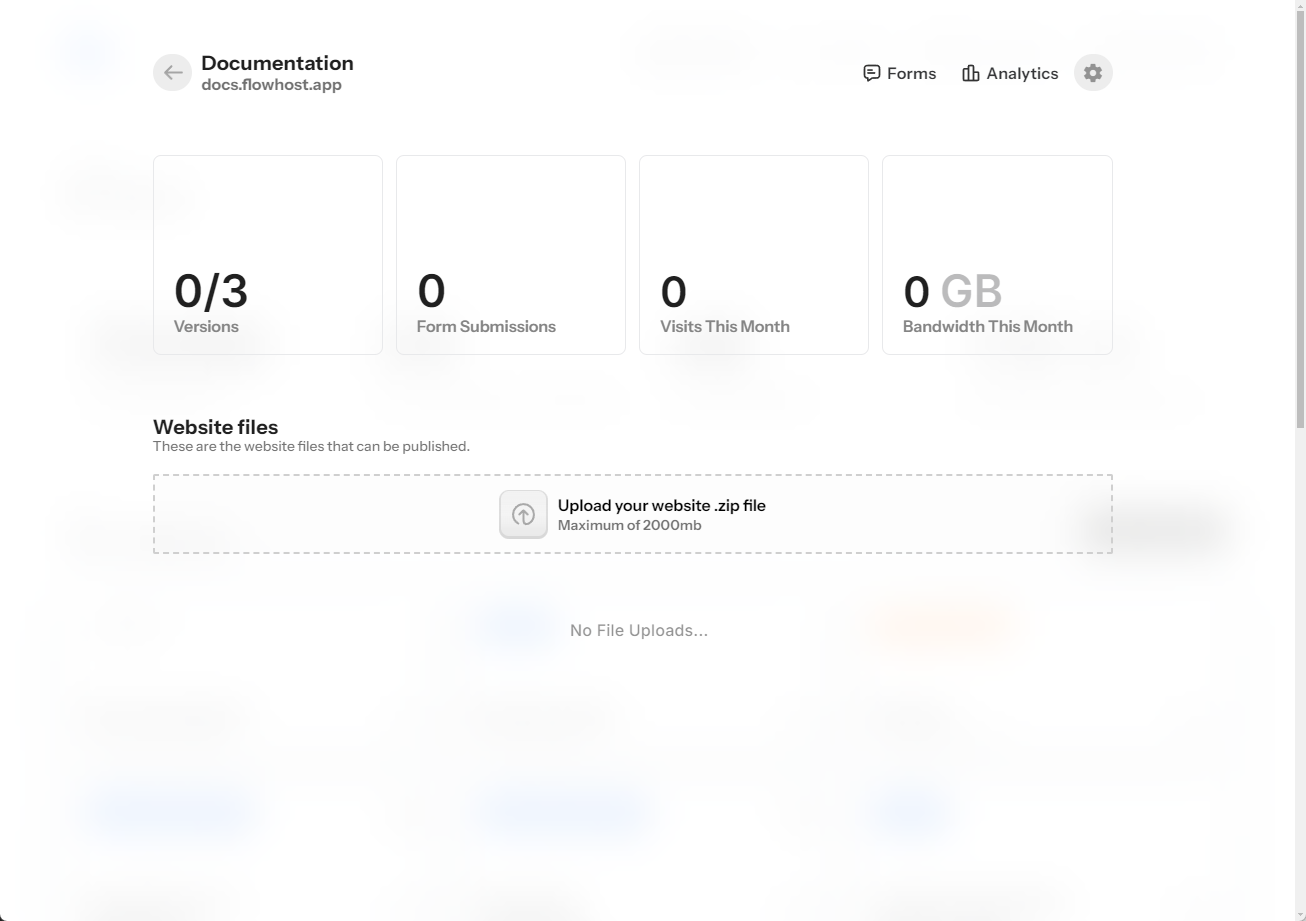
UPLOADING YOUR FILE
Now you can upload any Webflow Export. The upload has to be in .ZIP format: This is the website file you get from Webflow, When you export a Webflow website, you get a .ZIP File. This is the Zip file you upload, If you modified the file, just ensure that the structure of the file is the same as a Webflow exported file.
Depending on the plan you have, you will have a max size you can upload.
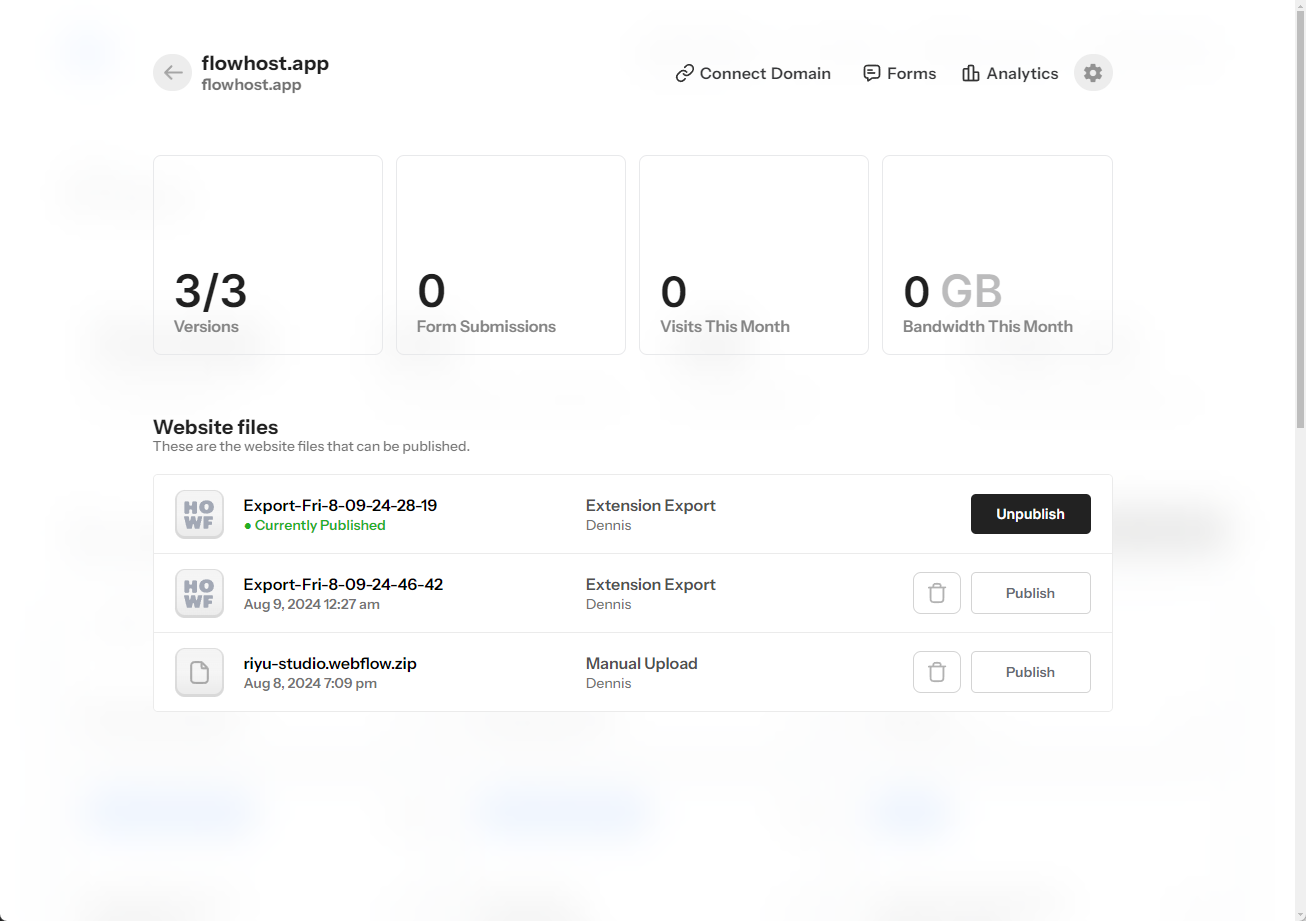
AFTER UPLOADING
After uploading the file, you can see the uploaded file. You can perform 3 different operations: Delete, Download, or Publish, it’s essentially self-explanatory.
- Delete: Deletes the file from HOWF
- Download: Downloads the file
- Publish: This publishes that file to the connected domain and staging domain
PUBLISHING YOUR WEBSITE
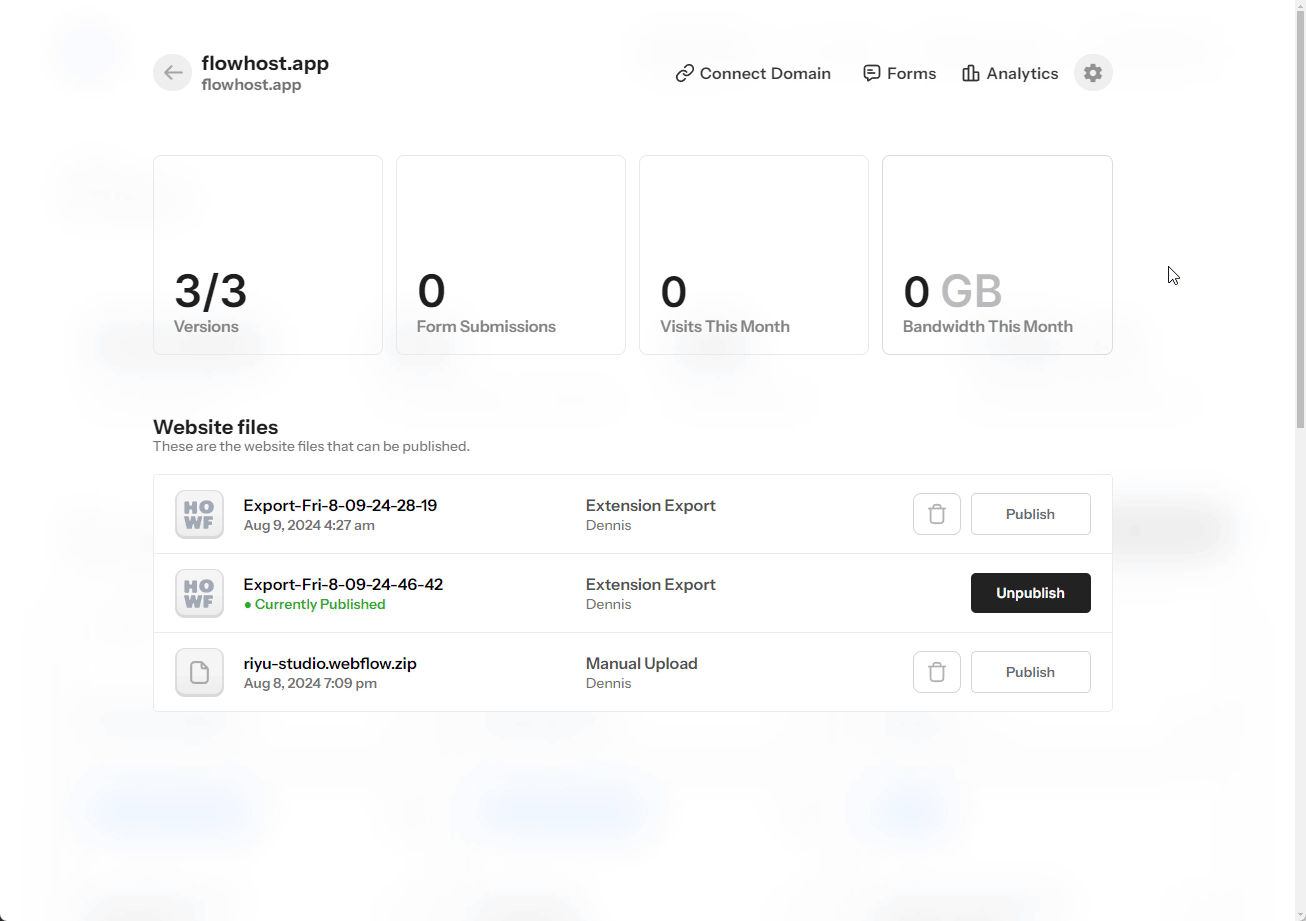
We set up a system that allows you to manage your website versions with ease. You can have up to 3 Website Versions per website and can unpublish or publish any of them seamlessly.
You can publish or unpublish any project by clicking the Publish/Published button.
YOU CANNOT DELETE A PUBLISHED FILE, YOU WOULD HAVE TO UNPUBLISH IT FIRST.

STAGING DOMAIN
A staging domain is essentially a domain with your hosted files and that shows exactly how it will look when your domain is connected. To get your staging domain, click on the Cogwheel ⚙️ on the top right of your screen.
This staging domain will house your published file. And will typically look like this: YourWebsiteName-1.howf.site
Need more Help?
It's best to prioritize linking your domain as the details provided may expire. Often, these details lapse after 72 hours from the time they're generated.
Connecting Your Domain
Connecting your domain is always a pain in the ass (excuse my language), But it’s a requirement for every website. We are currently working on an Auto Domain Connect but for now, this has to be done manually.
Manual Set-up
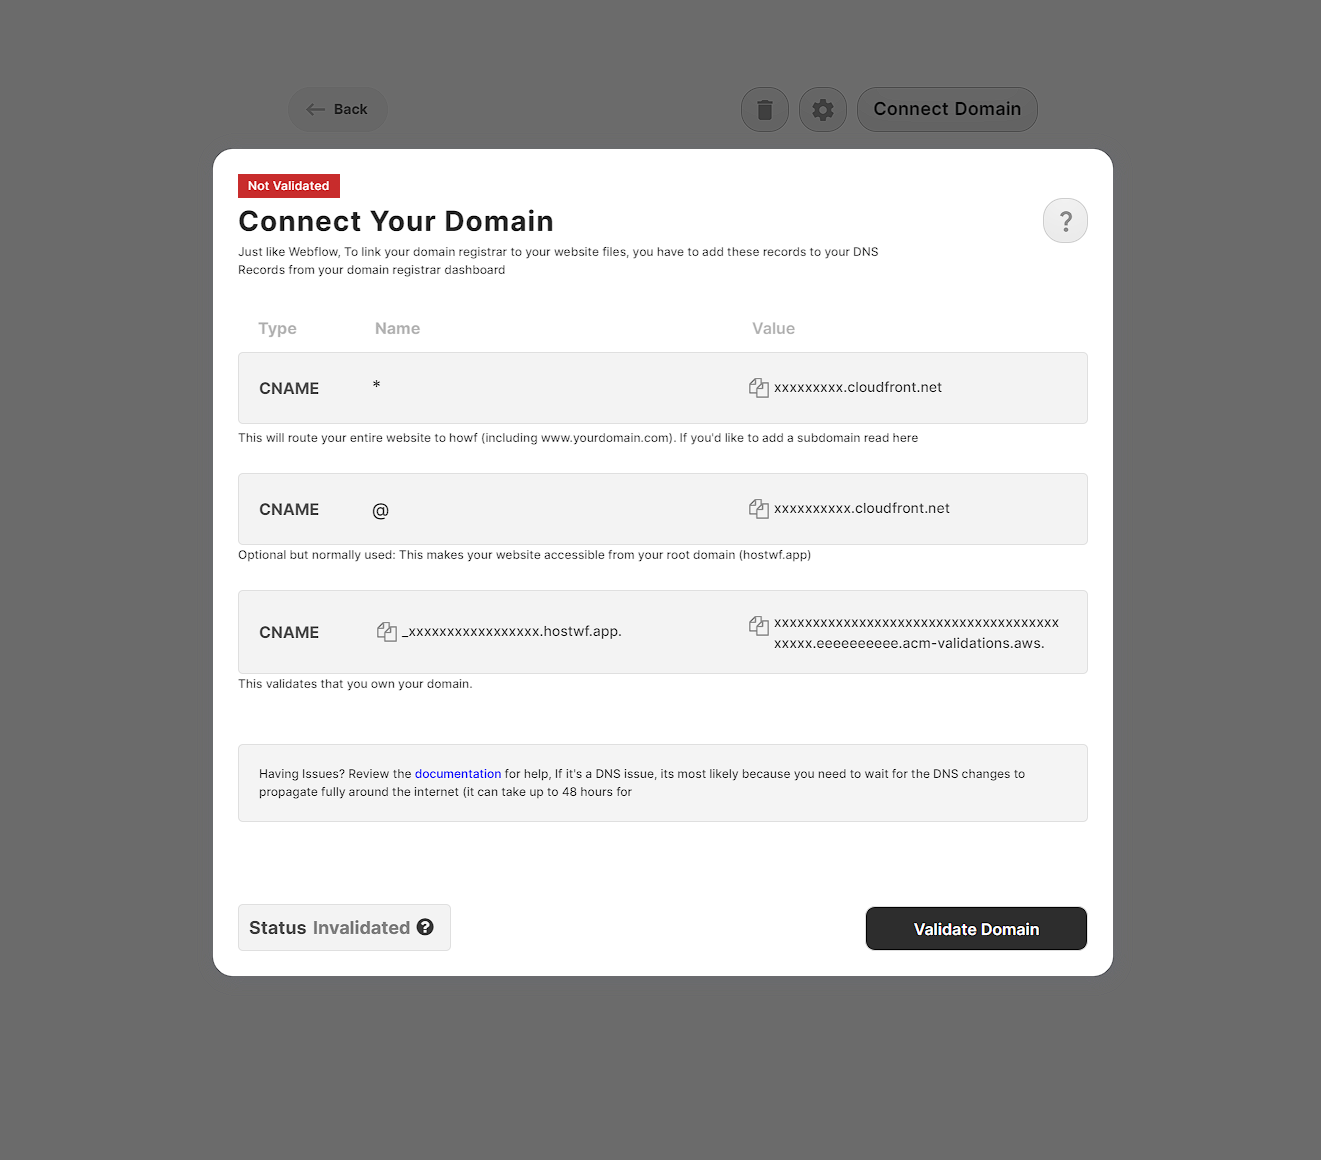
First off, the “Connect Domain” button is only visible when you have a file already uploaded. When visible, Click on Connect Domain and you will see a couple of records that need to be added to your DNS settings
Type: CNAME
Name: *
Value: xxxxxxxxx.cloudfront.com
Type: CNAME
Name: xxxxxxxxxxxxxxxxxxxxxxxxx
Value: xxxxxxxxxxxxxxxxxxxxxxxxxxxxxxxxxxx. .acm-validations.aws.
Routing root domain to www.
If you want to host your site on the root of your subdomain (e.g. https://yourwebsite.com) then we recommended setting up forwarding so yourwebsite.com forwards to www.yourwebsite.com. Or alternatively if your domain provider supports using "@" as a cname record, add that as a record with your www.yourwebsite.com as a value. Like this:
Type: CNAME
Name: @
Value: www.yourdomain.com
It can take some time for the CNAME records that you've applied to reflect across the internet. You can use a tool like DNSChecker.org to check this.
You should test your set-up by ensuring the correct value for the record set A displays in ALL regions
After adding the records to your DNS
Once you've added the records to your DNS, you have to navigate back to the "connect domain" modal and click validate domain. This process can take upwards of 40 minutes and could result in a range of domain "statuses".
Domain Status
Domain status change based on your uhh, domain status. When you are connecting your domain, here are a couple of statuses that could be visible to you.
Validated
This means that your DNS is perfectly set and everything should work as it is supposed to.
CNAME Error
This means that your CloudFront CNAME record (XXXXXXXX.cloudfront.net) is incorrect and points to another CloudFront. To fix this, cross-check that the CNAME provided by HOWF is exactly the same as what you have in your DNS
Failed
This means that your DNS validation process has failed, you would have to revalidate
Validating CNAME
This means your CNAME is being validated after it initially failed and showed the CNAME ERROR
What if my domain name is a subdomain
If you want to host the website files on a subdomain check the tab to your right for Connecting a subdomain option
Need more Help?
DNS records, typically it expire after 72 hours from you generating your domain details. Ideally only generate the dns details when you are ready to publish
Connecting a Subdomain
Connecting a subdomain is exactly the same as adding a domain, the only difference is the CNAME Name value added
If your website is dashboard.website.com
First off, the “Connect Domain” button is only visible when you have a file already uploaded. When visible, Click on Connect Domain and you will see a couple of records that need to be added to your DNS settings
Type: CNAME
Name: dashboard
Value: xxxxxxxxx.cloudfront.com
Type: CNAME
Name: xxxxxxxxxxxxxxxxxxxxxxxxx
Value: xxxxxxxxxxxxxxxxxxxxxxxxxxxxxxxxxxx. .acm-validations.aws.
It can take some time for the CNAME records that you've applied to reflect across the internet. You can use a tool like DNSChecker.org to check this.
You should test your set-up by ensuring the correct value for the record set A displays in ALL regions
After adding the records to your DNS
Once you've added the records to your DNS, you have to navigate back to the "connect domain" modal and click validate domain. This process can take upwards of 40 minutes and could result in a wide range of domain "statuses". You do not have to be on the page for this to complete.
Domain Status
Domain status change based on your uhh, domain status. When you are connecting your domain, here are a couple of statuses that could be visible to you.
Validated
This means that your DNS is perfectly set and everything should work as it is supposed to.
CNAME Error
The "CNAME Error" indicates that there's a mismatch between the CloudFront CNAME record (XXXXXXXX.cloudfront.net) you have set up and the one provided by HOWF. Essentially, your current CNAME might be pointing to a different CloudFront distribution. To resolve this, ensure that the CNAME you've received from HOWF matches the one you've entered in your DNS settings.
Failed
This means that your DNS validation process has failed, you would have to revalidate.
Validating CNAME
This means your CNAME is being validated after it initially failed and showed the CNAME ERROR
Possible Errors
Webhosting can get complicated and confusing, we compiled a list of things that could potentially go wrong and how to solve it. If you encounter a problem that isn't in this documentation please email support@flowhost.app
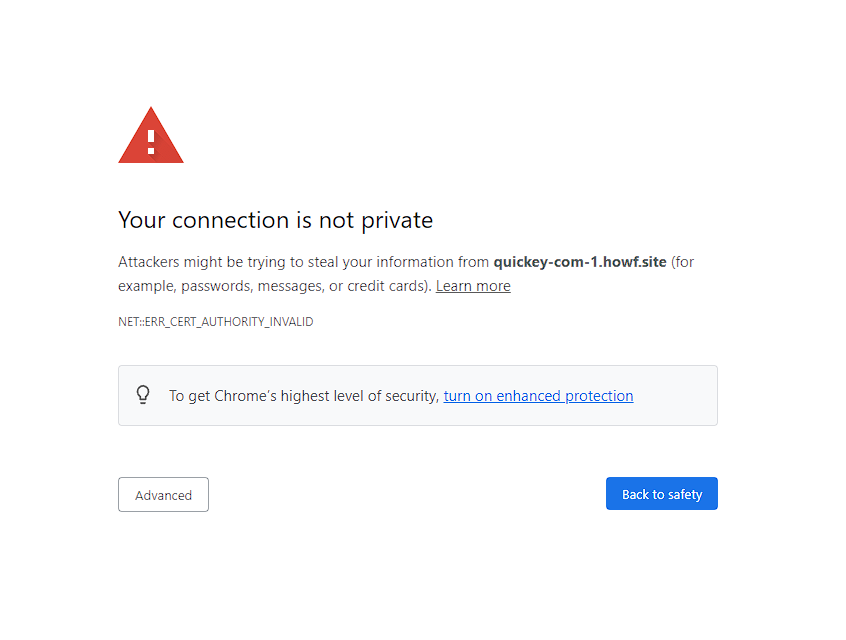
1. SSL Error
This normally happens when you load the website immediately after you create it, This occurs when the SSL has not propagated, Give it 3-10 minutes to propagate and reload the website (CMD +SHIFT + R).
IF IT IS STILL SHOWING THIS ERROR OR ANY SSL ERROR AFTER 20 MINUTES
- Open the website in incognito mode (if it does not show the error, you just have to hard-reload the website)
- Open the website on another browser (if it does not show the error, you just have to hard-reload the website)
- Contact us to help you out.
2. CNAME ERROR
This means that your CloudFront CNAME record (XXXXXXXX.cloudfront.net) is incorrect and points to another CloudFront. To fix this, cross-check that the CNAME provided by HOWF is exactly the same as what you have in your DNS
3. SSL Error #2
You typically get this right after your domain gets verified, this is common and has no issue, all you gotta do is wait a bit more for the SSL certificate to be propagated properly.
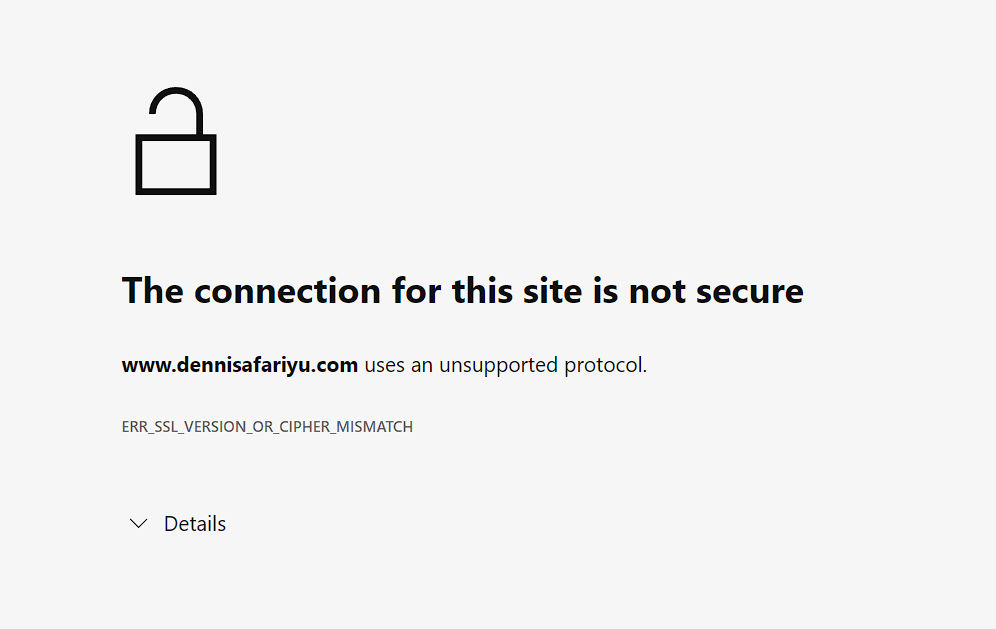
It can take a up to 48 hours for DNS records to propagate, give it a bit of time if it's not Validating
This Extension only works when you have a Webflow Workspace Plan
The FlowHost Extension
Flowhost extension makes external hosting as seamless as native Webflow hosting. Directly from your Webflow designer, you can select whatever project(created on FlowHost) and directly publish updates.
How it works(its super simple)
It may look like magic but it's just us taking the code of the website using Webflow's export code feature, sending it to our storage space, and publishing it from there.
Login into the extension
To access the extension, sign in using your FlowHost credentials (not Webflow). This enables the extension to fetch your websites from your FlowHost account. If it's a new website, You would need to create the website using the FlowHost dashboard though.
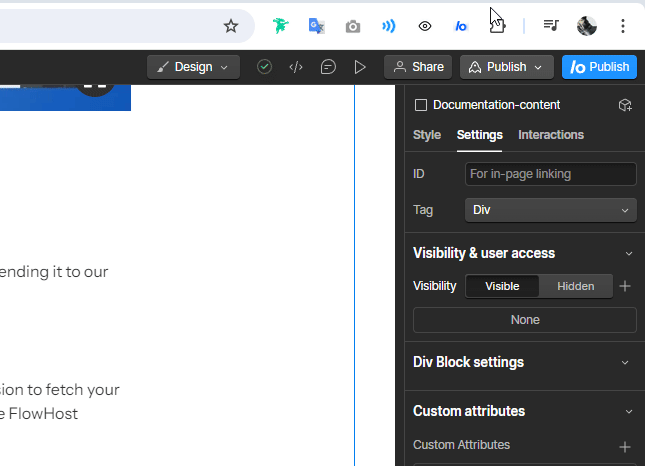
Using the extension
When you open any Webflow project and you have the FlowHost extension installed, a new blue button appears on the top right of your screen, right next to the native "Publish" button. Clicking that will open up this modal:
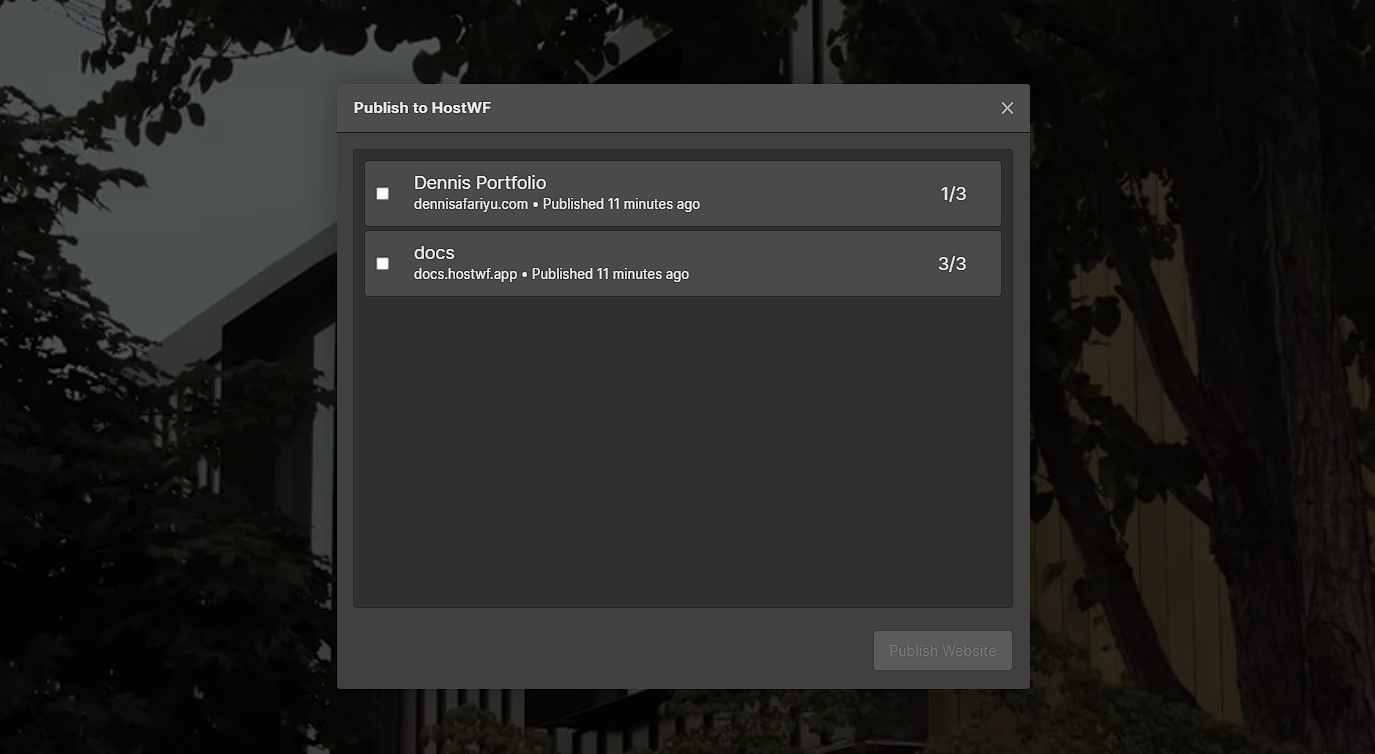
The Modal
This modal has primarily two elements. A list of websites (that you created) and a publish website button
- Your List of Websites: These are all the websites that you created on the FlowHost platform.
- The publish website button: This takes the website files, sends them to our servers, and publishes them to the staging domain and the custom domain(if its set up)
FLOWHOST CHANGE LOG / FEATURE BUILD
If interested, we are building out a Change Log or Feature build page.
IN PROGRESS: PASSWORD PROTECTION
IN ROADMAP: CMS INTEGRATION